

Quickstart
Add a website, copy its reporting headers, deploy them, and confirm the first browser report arrives. About 10 minutes end to end.
Last update:
This walks you from an empty workspace to reports arriving in the dashboard. Nothing in it enforces a policy, so you can run it on production without changing how any page behaves.
Prerequisites
Before you start, make sure you have:
- A CentralCSP account and a workspace. Signing up creates your first workspace for you.
- Permission to set HTTP response headers on the site, at your web server, CDN, or application framework.
- The site served over HTTPS. The Reporting API only delivers from a secure context.
1. Add your website
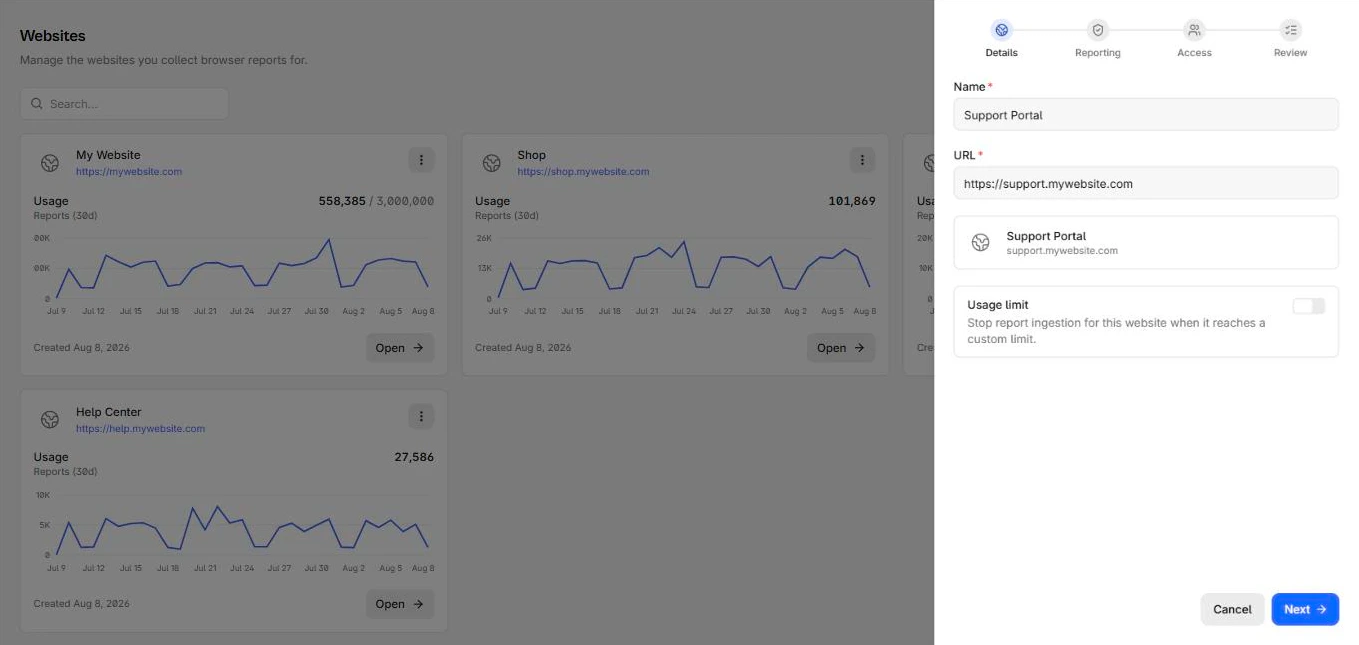
Open Websites and select Add website. The wizard has four steps.
- Details. Give the site a name and its public URL. Optionally set a usage limit, which stops ingestion for this site once it reaches a number you choose.
- Reporting. Choose which report types to collect and how to filter what gets stored.
- Access. Grant people or groups access to this website.
- Review. Confirm and create.
Only the name and URL are required. Every other setting is editable afterwards under the website's Settings, so take the defaults if you are not sure yet.
The wizard opens on its Details step:
2. Copy your reporting headers
Open the new website and go to Setup. CentralCSP generated a collection URL that belongs to this website alone, shown under Reporting endpoint.
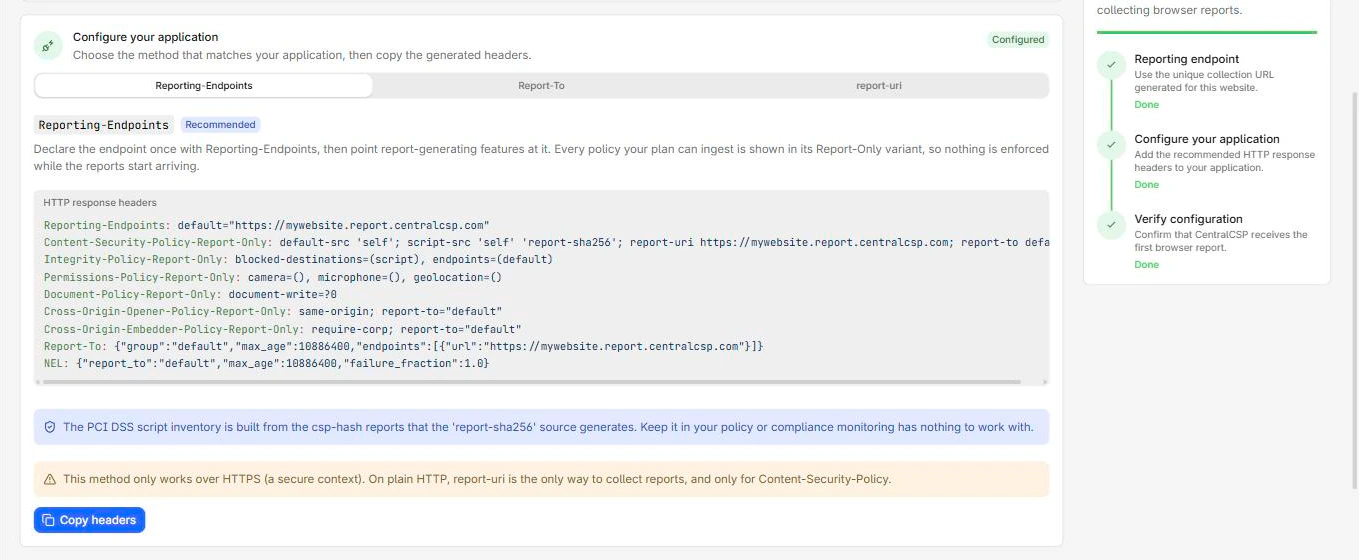
Under Configure your application, pick the method that matches your stack. Reporting-Endpoints is the modern one and the one to use unless you have a reason not to.
The generated block declares the endpoint once, then points each reporting feature at it. Declare the endpoint first:
Reporting-Endpoints: default="https://<ENDPOINT_ID>.report.centralcsp.com"Then point a policy at that named endpoint. Every policy is generated in its Report-Only variant, so browsers report violations without blocking anything:
Content-Security-Policy-Report-Only:
  default-src 'self';
  script-src 'self' 'report-sha256';
  report-uri https://<ENDPOINT_ID>.report.centralcsp.com;
  report-to default
Use your own endpoint URL
<ENDPOINT_ID> is a placeholder. Your endpoint URL is unique to this website, so copy it from the Setup page rather than typing it from here. Copy headers puts the whole generated block on your clipboard.
Keep report-sha256 in script-src
The 'report-sha256' source is what makes browsers report a hash of every script they load. That stream is what the script inventory and your PCI DSS script review are built from. Remove it and compliance monitoring has nothing to work with.
The block also includes report-uri alongside report-to. That is deliberate: report-uri is deprecated but still the only mechanism some browsers honour, and browsers that support both ignore report-uri when report-to is present. Keeping both costs nothing and widens coverage.
The Setup page generates the block for you to copy:
3. Deploy the headers
Add the headers to every HTML response your site returns. Where that happens depends on your stack, but the rule is the same everywhere: the headers must be on the document response, not on assets alone.
add_header Reporting-Endpoints 'default="https://<ENDPOINT_ID>.report.centralcsp.com"' always;
add_header Content-Security-Policy-Report-Only "default-src 'self'; script-src 'self' 'report-sha256'; report-to default" always;
If you only want to start with CSP, deploy the first two headers and add the rest later. Each policy is independent.
4. Verify the first report arrives
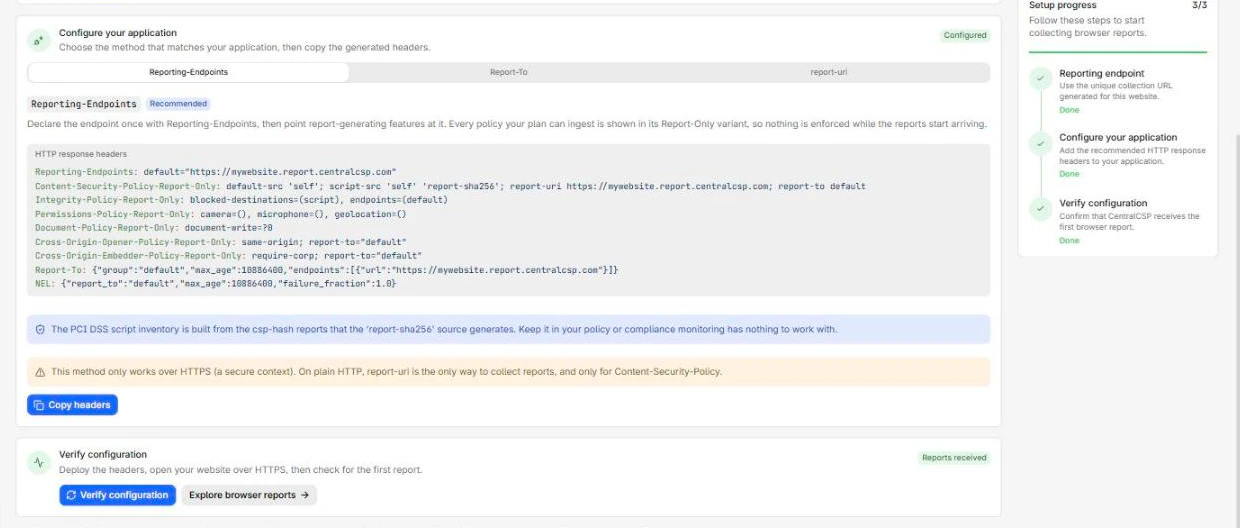
Back on Setup, the Verify configuration section shows a live count of reports received. Open your site over HTTPS in a browser, browse a page or two, then select Verify configuration.
Reports are batched by the browser rather than sent instantly, so allow up to a minute. Setup progress turns all three steps green once a report lands.
If nothing arrives, check in this order:
- The page is served over HTTPS. On plain HTTP no report is delivered.
- The headers are present on the HTML document response. Check the Network tab, not your config file.
- The endpoint URL matches the one on the Setup page exactly.
- Under Settings > Ingestion, Allowed origins is either empty or lists the origin you are testing from.
The Reporting API configuration checker answers the second point from outside the browser: give it your URL and it lists the reporting headers the site actually returns.
Once a report lands, the card and the progress panel both confirm it:
5. Do these three things next
You now have a site collecting reports with nothing enforced. Before the data piles up:
- Drop extension noise: Under Settings > Ingestion, turn on Drop reports from browser extensions. It is off by default, and extension-injected scripts are the largest source of violations you cannot fix. For more information, refer to Ingestion filters.
- Work the CSP page one directive at a time: The first batch is noisy by design, because the generated policy allows nothing beyond your own origin. That list is inventory, not incidents. For more information, refer to CSP violations.
- Define payment page scope, if card data is in play, before reviewing any scripts. For more information, refer to PCI DSS.
Next steps
Your site now collects browser reports with nothing enforced. Work the report pages to see what your visitors' browsers observed, then tighten each policy from what you find.
Overview
CentralCSP collects the policy and error reports browsers send about your site, inventories your scripts, and turns both into signal and PCI DSS evidence.
Overview
A website is the core object in CentralCSP. Add one, wire its reporting headers, tune what it collects, and control who can see it.